
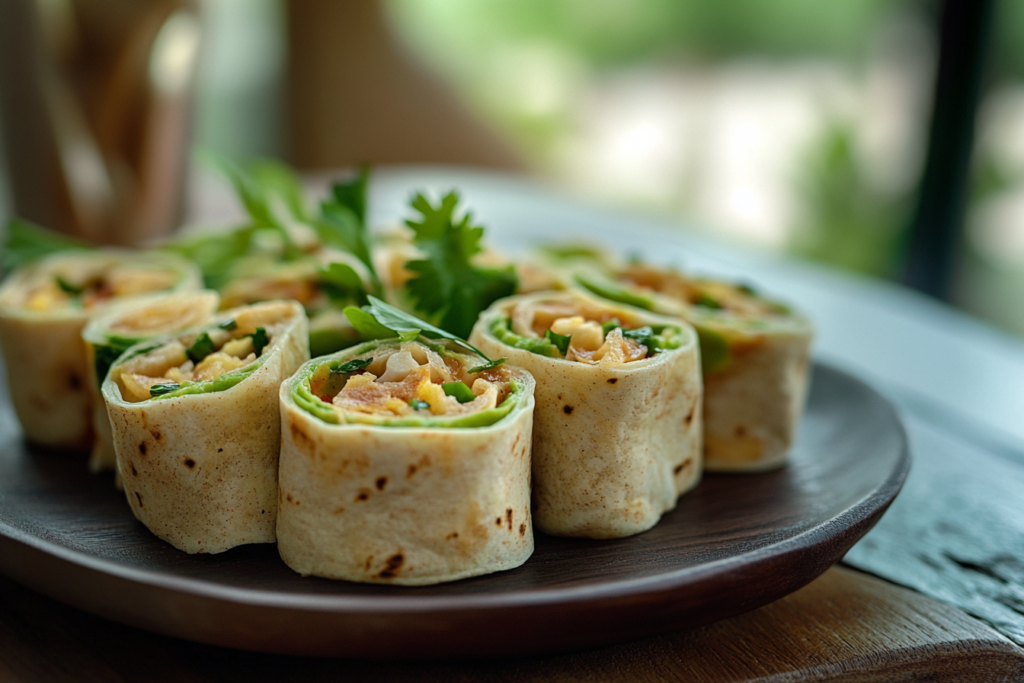
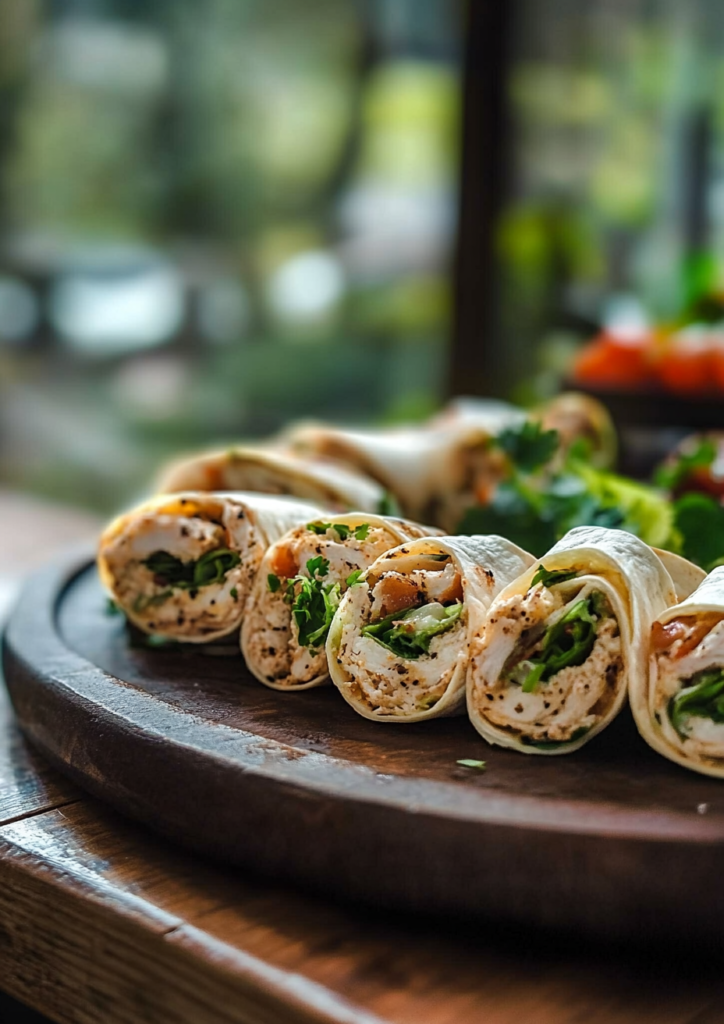
When summer hits, the last thing you want is to be stuck cooking in a hot kitchen. That’s where these Irresistible Mini Wraps for Poolside Snacking Bliss come in. They’re light, fresh, and easy to grab between dips in the pool. Whether you’re hosting a backyard gathering or need something simple for a sunny afternoon, these wraps are your new favorite snack.
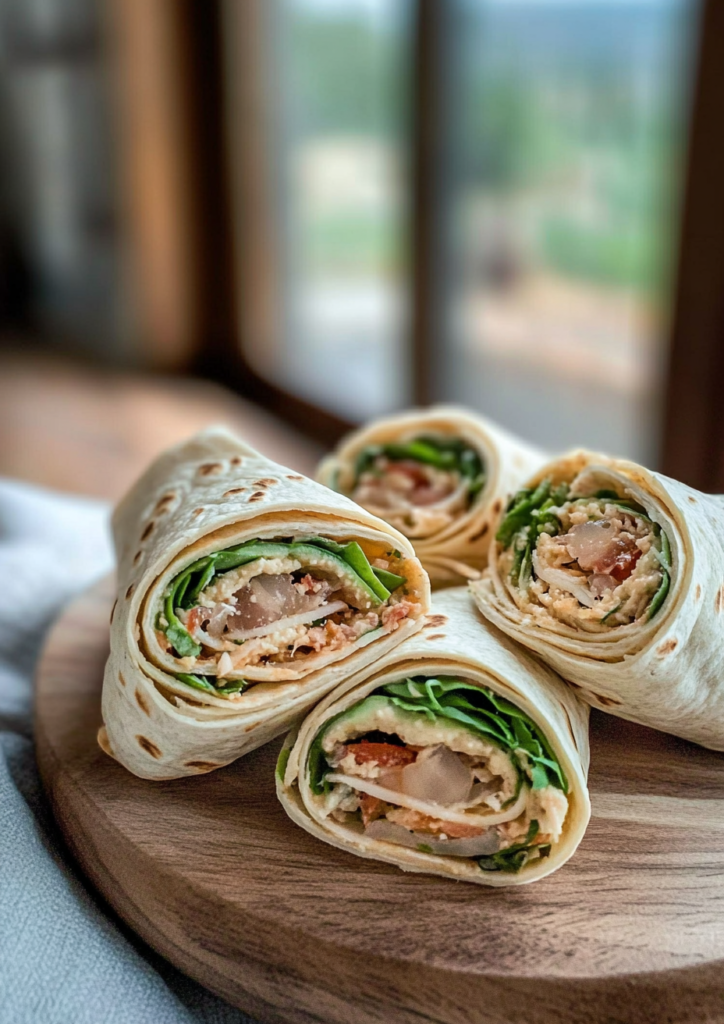
Mini wraps are perfect for summer because they’re small, flavorful, and totally customizable. Think of them like a blank canvas — you can go with grilled chicken and crisp lettuce, creamy hummus and crunchy veggies, or turkey and cheddar with a dash of ranch. Everything is rolled up in a soft tortilla, sliced into bite-sized rolls, and ready to serve cold or at room temp. No reheating, no mess.
Why You’ll Love This mini wraps for poolside snacking
Mini wraps are everything you want in a summer snack: quick, easy, delicious, and perfect for sharing. First, they’re super convenient. No utensils. No mess. Just grab and go. You can make them ahead, store them in the fridge, and pull them out when guests arrive — no reheating needed.
Next, they’re customizable. Got picky eaters? No problem. You can make several versions — some with chicken and ranch, some with veggies and hummus, some with turkey and cheddar. Use flour, whole wheat, or gluten-free tortillas. Add your favorite sauces or keep it simple. You’re in control.
They’re also lighter than traditional party foods, which is great when it’s hot out. With fresh veggies, lean meats, and yogurt-based spreads, these wraps won’t weigh you down. Plus, they’re alcohol-free and pork-free, making them perfect for family-friendly gatherings.
Best of all, they’re fun to make. Get the kids involved or set up a wrap station where everyone builds their own. Whether it’s a party or a quiet weekend, these mini wraps deliver on taste, convenience, and poolside vibes.
What You’ll Need
These mini wraps come together with just a few simple ingredients — nothing fancy, but each one plays an important role in building bold, fresh flavor. Best of all, you can customize everything based on what you love or already have at home. Here’s what you’ll need to start:
Tortillas:
- 4 soft flour or whole wheat tortillas (8-inch size works best)
Proteins (pick one or mix):
- 1 cup cooked grilled chicken (shredded or diced)
- 1 cup turkey (deli-style or shredded)
- 1 cup egg salad or mashed chickpeas for a meat-free version
Veggies:
- ½ cup shredded lettuce
- ½ cup shredded carrots
- ½ cup thin cucumber slices
- ½ cup chopped bell peppers
- ½ avocado, mashed
Cheese (optional):
- ½ cup shredded cheddar or mozzarella
Spreads & Sauces:
- ¼ cup Greek yogurt ranch or hummus
- 1 tbsp lemon juice
- 2 tbsp chopped fresh herbs (parsley, basil, or cilantro)
- Salt & pepper to taste
These ingredients can be combined in countless ways — creamy, crunchy, hearty, or fresh. They’re easy to layer and make for a cool, refreshing bite on a hot day.
How to Make mini wraps for poolside snacking
These wraps are super easy and don’t require any cooking. They’re quick, kid-friendly, and great for prepping ahead. One tortilla makes 6 mini rolls — just right for poolside sharing.
Ingredients (for 4 wraps / 24 mini rolls):
- 4 tortillas
- 1 cup grilled chicken
- ½ cup shredded lettuce
- ½ cup carrots
- ½ cup cucumbers
- ½ cup bell peppers
- ½ avocado
- ¼ cup yogurt ranch
- ½ cup cheddar cheese
- 1 tbsp lemon juice
- 2 tbsp fresh herbs
- Salt & pepper
Steps:
- Prep ingredients: Slice veggies, mash avocado with lemon juice and a pinch of salt.
- Spread: Lay out tortillas and spread a thin layer of avocado or yogurt ranch across each one.
- Layer fillings: Add lettuce, veggies, protein, cheese, and herbs evenly.
- Roll tightly: Start at one end and roll each tortilla into a snug log.
- Chill (optional): Wrap in plastic and refrigerate 20–30 minutes to firm up.
- Slice: Cut each roll into 6 even pieces. Serve on a tray or platter.
That’s it! These wraps are simple, quick, and packed with summer-friendly flavors — perfect for snacking anytime by the pool.
You Must Know
Before you roll up those delicious mini wraps, there are a few key things that can make all the difference. These aren’t complicated, but they’ll save you from common mistakes and make prep smoother and results better.
Use Soft Tortillas:
If your tortillas are stiff or dry, they’ll crack. Use fresh ones and microwave them for 10–15 seconds to soften before rolling.
Watch Moisture:
Too much spread (like hummus or avocado) can make wraps soggy. Use a thin layer, and always pat juicy veggies like tomatoes or cucumbers dry before adding.
Don’t Overfill:
It’s tempting to stuff your wrap, but too much filling makes it hard to roll and cut. Think light layers — a little goes a long way.
Chill Before Cutting:
This small step changes everything. Wrap the rolled tortillas in plastic wrap and chill for 20 minutes before slicing. It helps hold their shape and gives a cleaner cut.
Slice Smart:
Use a sharp, non-serrated knife and wipe it between cuts. This keeps the wrap from smushing and helps slices look neat.
Customize Wisely:
Out of chicken? Try turkey, chickpeas, or even egg salad. No ranch? Use Greek yogurt or hummus. Mini wraps are flexible — you can easily swap in what you like or have.
Make-Ahead Tips:
Assemble the wraps the night before your event, but slice them just before serving to keep them fresh and presentable.
Mini wraps are simple, but these small tweaks go a long way in making them look pro and taste fantastic.
Perfecting the Cooking Process
While these wraps don’t need actual cooking, there’s definitely a technique behind making them look and taste their best.
Prep First:
Chop all veggies, mash spreads, and lay everything out assembly-line style. This makes building each wrap quicker and more consistent.
Layer in Order:
Start with your spread, then greens, proteins, veggies, herbs, and finally cheese. This keeps everything in place and balanced.
Roll It Tight:
Roll firmly but not too tight, or the wrap might tear. Keep the shape snug so each bite has a little of everything.
Chill and Slice:
After rolling, wrap in plastic and chill for 20–30 minutes. This helps the wrap stay firm and makes slicing super clean.
Use the Right Knife:
A sharp chef’s knife or serrated blade works best. Don’t saw — use clean, single cuts, and wipe between each one.
Batch-Make for Parties:
Hosting a pool party? Double or triple the recipe, wrap in plastic, and chill in advance. Slice and serve when ready.
Serve Cold or Room Temp:
No heating required — just slice, plate, and enjoy. Perfect for hot summer days when no one wants to turn on the stove.
Even without cooking, perfecting the process means better flavor, better presentation, and less mess. All it takes is a little care.
Add Your Touch
Mini wraps are super flexible—you can easily make them your own! Start by swapping proteins: grilled chicken, turkey, canned tuna, or chickpeas all work great. For veggies, mix it up with spinach, arugula, or crunchy options like shredded carrots and radishes. Add sweetness with thin apple slices or a drizzle of honey in your spread.
Try different spreads too—think hummus, guacamole, or Greek yogurt with herbs instead of just ranch. Add a bit of crunch with seeds or crushed tortilla chips. Want a flavor twist? Go Mediterranean with olives and feta, or southwest with corn and salsa.
For kids, keep it simple: mild cheese, turkey, and a creamy spread like cream cheese. Pinwheel shapes make them fun to eat. The key is to experiment and make every wrap unique and tasty!
Storing & Reheating
Mini wraps store well if done right. For short-term (a few hours), wrap tightly in plastic and keep refrigerated. For overnight storage, do the same and slice just before serving to avoid sogginess.
Need a quick meal idea for tomorrow? We’ve got you covered.
If prepping for meal prep, choose sturdy fillings like spinach and grilled chicken, avoiding wet veggies that wilt. Leftover pinwheels can be stored in airtight containers with parchment paper between layers, best eaten within 1–2 days.
No reheating needed—mini wraps taste best cold or at room temp. If too cold, let them sit a few minutes before serving. Avoid freezing, as it makes wraps soggy and mushy.
For pool days or picnics, pack in a cooler to keep fresh and safe. Proper storage keeps your wraps tasty and ready whenever you want to snack.
Chef’s Helpful Tips
Making mini wraps is easy, but these pro tips will help you get the best results every time:
Another weeknight dinner idea you can’t go wrong with.
- Warm Your Tortillas: Before assembling, warm tortillas in the microwave or on a dry skillet for 10–15 seconds. This makes them more pliable and less likely to crack when rolling.
- Keep It Balanced: Don’t overstuff. Too much filling makes rolling tricky and cuts messy. Aim for thin, even layers of spread, protein, and veggies.
- Chill Before Cutting: Wraps hold together better if refrigerated for at least 20 minutes before slicing. This makes clean, neat pinwheels.
- Use a Sharp Knife: A sharp chef’s knife or serrated blade cuts through the wrap smoothly. Clean the blade between cuts to avoid smearing.
- Prep Ahead: You can assemble wraps a day before your event. Keep them tightly wrapped in plastic wrap and slice just before serving for freshness.
- Keep Ingredients Dry: Pat wet veggies dry to prevent soggy wraps. Use spreads sparingly to keep tortillas from getting soggy.
- Experiment: Try different proteins, spreads, and veggies. Mini wraps are versatile, so tailor them to your taste or dietary needs.

FAQ
Q: Can I use gluten-free tortillas?
A: Absolutely! Gluten-free or whole wheat tortillas work well. Just warm them to make rolling easier.
If you loved this, you’ll want to bookmark this recipe too.
Q: How long do mini wraps stay fresh?
A: When wrapped tightly and refrigerated, they last about 1–2 days. Slice them just before serving for best texture.
Q: Can I freeze mini wraps?
A: Freezing is not recommended because fresh veggies and spreads don’t freeze well, making the wrap soggy.
Q: What if I don’t have chicken?
A: Swap with turkey, tuna, beans, or hard-boiled eggs for protein options.
Q: How to prevent soggy wraps?
A: Use thin layers of spread and dry your veggies. Chill the wraps before slicing to help hold shape.
Q: Can I make these vegan?
A: Yes! Use plant-based spreads, veggies, and proteins like hummus, avocado, and beans.
Conclusion
Mini wraps are the ultimate poolside snack — easy to make, customizable, and perfectly portable. Whether you’re hosting a summer party, packing lunches, or just craving a light bite, these little wraps deliver big on flavor and convenience. With simple ingredients, no cooking needed, and endless ways to personalize, they fit every taste and occasion.
By following the tips in this guide, from softening your tortillas to chilling before slicing, you’ll serve up beautiful, tasty wraps that impress every time. Plus, with smart storage and ingredient swaps, you can prepare ahead without stress.
So, grab your favorite fillings, roll them up tight, and get ready to enjoy the perfect poolside snack bliss. Your guests — and your taste buds — will thank you!
Mini Wrap Magic: Irresistible Snacks for Your Next Pool Day
Description
These quick and fresh mini wraps are the ultimate poolside snack! Loaded with crisp veggies, tender chicken, and creamy dressing—all rolled up and sliced into bite-sized pinwheels. Perfect for warm-weather lunches, picnics, or party platters!
Ingredients
Instructions
Warm tortillas briefly for easy rolling.
Spread ranch or hummus evenly on each.
Layer chicken, cheese, veggies, and greens.
Roll tightly, wrap in plastic, and chill for 20 minutes.
Slice into pinwheels and serve cold.
Notes
- For vegetarian wraps, swap chicken with chickpeas or tofu strips.
Use gluten-free tortillas if needed.
Chill before slicing for clean pinwheels.
Great for lunchboxes or party trays.